Grow Your Green Thumb With A Solar-Powered Irrigation System Project

You want healthy plants, smaller water bills, and fewer sweaty evenings dragging a hose around. A Solar-Powered Irrigation System Project checks all those boxes—powering a pump with sunshine, moving water from a tank or well, and delivering it precisely to roots with drip lines or micro-sprays. In this friendly, step-by-step guide, you’ll learn the parts, the plan, the build, and the smart tweaks that make it hum—plus research-backed tips and five proven product picks.
What Your Solar-Powered Irrigation System Project Looks Like
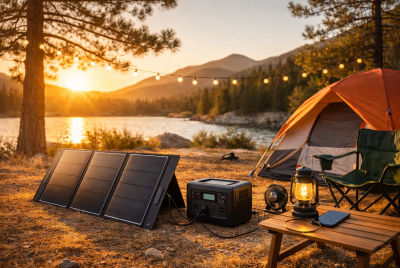
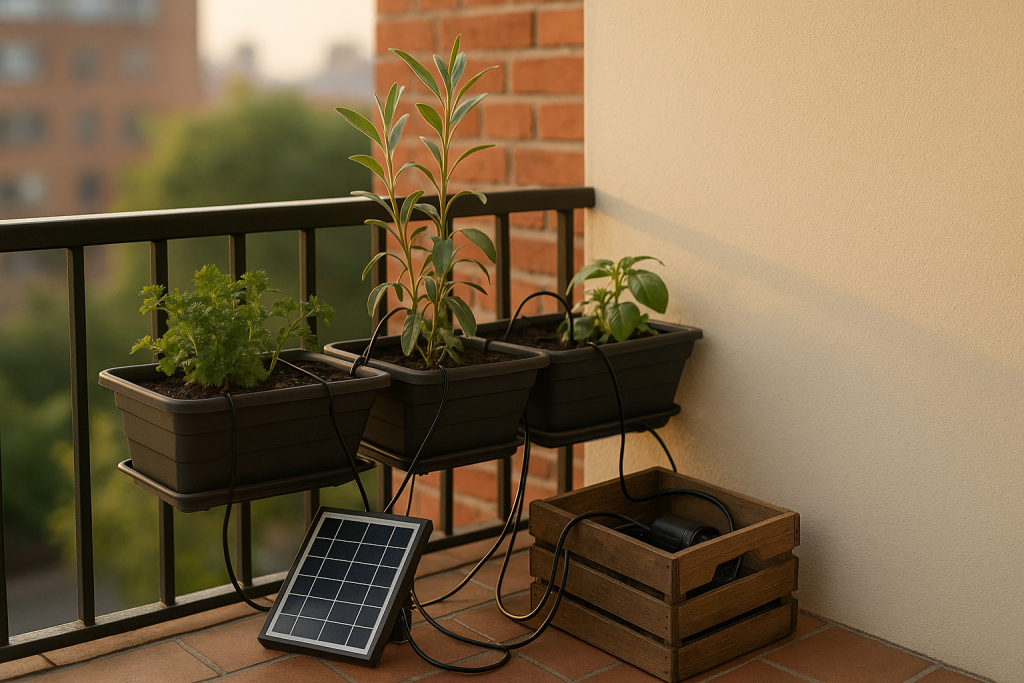
Picture this: a compact solar panel charging a small battery, a quiet DC diaphragm pump drawing from your rain barrel, and drip irrigation lines feeding each bed. A timer or soil moisture sensor decides when to run. The system fits tiny patios or multi-bed gardens and scales nicely for small plots. It’s tidy, off-grid, and wonderfully hands-off.
The one-line flow
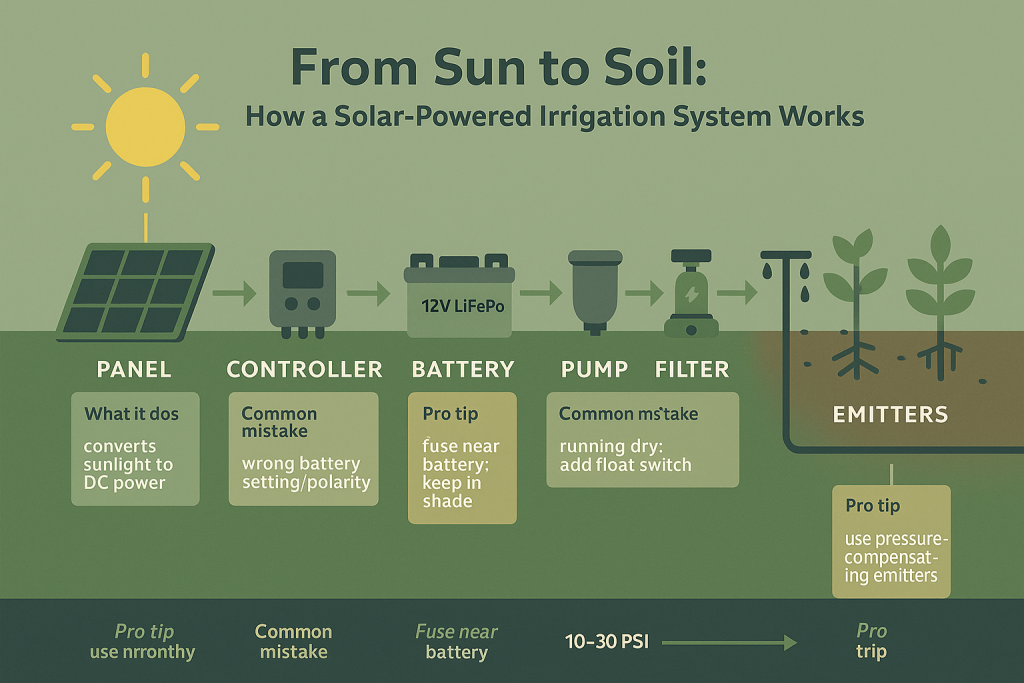
Sun → solar panel → charge controller → (battery) → pump → filter → pressure regulator → mainline → emitters.
Why Build It: Benefits You’ll Feel in Week One
- Automatic consistency. Plants thrive when watering is steady, not feast-or-famine.
- Big water savings. Drip hits the root zone, not the sidewalk.
- Lower operating costs. Sunshine powers pumping; no trenching wires or paying for grid power.
- Healthier growth. Even moisture reduces blossom-end rot, mildew risk on foliage, and stress.
- Modular by design. Start with one bed, add zones as you grow.
How It Works (Sun → Pump → Plants)
Solar panels produce DC power. A charge controller protects and charges the battery (or runs daylight-only if you skip the battery). A 12V/24V pump pushes water through a filter and pressure regulator into your mainline tubing. Pressure-compensating emitters or micro-sprays deliver a predictable flow at each plant. You can control it with a simple timer or trigger it when the soil actually dries out.
Plan First: Site, Water, and Zones
- Sun exposure: Mount panels where they see unobstructed midday sun.
- Water source: Rainwater harvesting tanks are great; add a sediment pre-filter for silty sources.
- Elevation & distance: Note the highest outlet and the longest run—pumps must overcome total dynamic head (vertical lift + friction).
- Zones: Group plants with similar thirst. Leafy greens? One zone. Fruit trees? Another.
Quick reflection: Which bed dries out first at your place—and why? That’s a zone hint.

The Core Components (and Good Alternatives)
- Solar panel(s): Rigid or portable panels (60–200 W+ depending on size of system).
- Charge controller: PWM for budget builds; MPPT for efficiency and bigger arrays.
- Battery: 12V LiFePO₄ for long life and light weight; AGM works on a budget.
- Pump: Self-priming DC diaphragm pump for drip; a submersible if drawing from a deep tank/well.
- Filtration & regulation: Inline filter + 10–30 PSI pressure regulator for drip lines.
- Distribution: 1/2″ mainline + 1/4″ distribution lines, pressure-compensating emitters, micro-sprays, or micro-bubblers.
- Brains: Hose-end timer or 12V relay; optional soil moisture sensor; float switch to protect from dry-run.
- Safety bits: MC4 connectors, correct gauge wire, weatherproof box, and an inline fuse close to the battery.
Quick Sizing Math You Can Trust
- How long will you water daily?
Example: 40 minutes/day. - What’s the pump draw?
A small 12V diaphragm pump might draw ~6–8 A under load. - Daily energy:
8 A × 40/60 hr ≈ 5.3 Ah/day (~64 Wh at 12V). - Battery capacity:
Multiply daily Ah by ~5–7× for a healthy buffer → 35–40 Ah starter battery. - Panel size:
If your growing season offers ~4–5 sun hours/day, a 50–100 W panel covers the example above with headroom (go bigger for more zones, shade, or cloudy regions).
Rule of thumb: When you expand plantings, double panel and battery before upgrading the pump.
Layout Options: Pots, Beds, and Small Plots
- Balcony / patio (10–20 pots): 10–30 W panel, tiny 12V pump, 20–35 Ah battery, all 1/4″ lines.
- Backyard beds (50–150 plants): 50–100 W panel, 12V 3.0 GPM pump, 50–100 Ah battery, 1/2″ mainline + emitters.
- Compact orchard / small plot: Multi-zone with solenoid valves, 200 W+ array, larger storage tank.
Automation & Smart Control (So You Actually Relax)
- Hose-end timers: easiest drop-in scheduling.
- 12V relay + microcontroller: run by time of day or soil moisture.
- Soil moisture sensors: water when the bed is truly dry, not just because it’s 6 p.m.
- Float switch in tank: cuts power if the water source runs low (save that pump!).
Water Efficiency: Drip vs. Micro-Sprays
Use drip emitters (0.5–2.0 GPH) for targeted roots, minimal evaporation, and fewer weeds. Choose micro-sprays for densely planted greens or groundcovers. Either way, pressure-compensating emitters keep flows even across long runs and slight elevation changes.
Installation: From Panel to Plants (Step by Step)
- Mount the panel(s) at roughly your latitude angle; avoid shade.
- Wire panel → charge controller (PV input), then controller → battery (observe polarity; add a fuse near the battery).
- Battery → pump through a switch or timer/relay.
- Plumb the pump: source → sediment screen → filter → pump → pressure regulator → mainline.
- Lay tubing: 1/2″ along beds; punch 1/4″ lines to each plant.
- Install emitters (start 1 GPH for veggies; adjust seasonally).
- Program control and test for leaks, clogs, or low pressure at the farthest run.
- Flush lines before final emitter install to clear debris.
Safety & Maintenance Best Practices
- Fuse the battery line (close to battery).
- Secure wiring in UV-resistant loom; strain-relief near the panel.
- Clean panels (dust and pollen reduce output).
- Flush filters monthly in silty areas; winterize lines before freezes.
- Replace emitters that clog or slow; keep a small bag of spares.
Troubleshooting: Quick Fixes That Work
- Pump short-cycles: add a small accumulator tank or split into two zones.
- Weak flow at the end: upsize the mainline or shorten the run; verify regulator.
- Pump runs, no water: check prime height, intake screen, and tank level.
- Timer works, pump won’t: inspect the fuse, verify 12V at the terminals, and battery charge profile on the controller.
- Uneven watering: switch to pressure-compensating emitters and verify 10–30 PSI at the manifold.
Research-Backed Insights (Credibility Corner)
- A recent peer-reviewed review in Water (2024) found that drip irrigation can significantly cut overall water use by reducing soil evaporation, while also improving plant growth indicators like leaf area index and supporting healthy transpiration—exactly why drip pairs so well with solar pumping. Read it here: A Review of Drip Irrigation’s Effect on Water, Carbon Fluxes and Crop Growth in Farmland.
- For design choices, economics, and groundwater safeguards, the FAO/GIZ Solar-Powered Irrigation Systems (SPIS) Toolbox is the gold-standard playbook. It includes calculators, sizing guides, and checklists to right-size your system and avoid over-abstraction: SPIS Toolbox (official site) and FAO’s overview of SPIS resources: FAO on Solar-Powered Irrigation.
🔹 Affiliate Product Picks: 5 Components That Play Nicely
1) ECO-WORTHY Solar Submersible Pump Kit (100W Panel + 12V Pump)
Why it helps: A starter bundle that pairs a 100W panel with a submersible pump—handy if you want one box to begin.
Notable specs: 100W mono panel, 12V submersible pump; suitable for general off-grid watering with basic controller included (per listing).
Pros: All-in-one; straightforward for tank/well setups.
Cons: For raised beds above grade, you may prefer a surface diaphragm pump to regulate pressure precisely.
Best for: Small gardens with a storage tank or shallow well.
Review snapshot: Buyers like convenience; note that long vertical lifts need careful setup.
2) SHURFLO 4008-101-E65 “Revolution” 12V DC Water Pump (3.0 GPM, 55 PSI)
Why it helps: A proven on-demand diaphragm pump with an internal bypass for smoother flow—excellent for drip manifolds and micro-sprays.
Notable specs: ~3.0 GPM, 55 PSI shut-off, self-priming up to ~6 ft, dry-run capable (model dependent).
Warranty: 2-year limited aftermarket warranty (verify current terms on the listing/manual).
Pros: Reliable brand, steady pressure, widely available parts/repair kits.
Cons: Mount on vibration-damping pads to keep noise down; pair with a filter and 10–30 PSI regulator for drip lines.
Best for: Backyard beds and multi-zone raised-bed systems needing consistent pressure.
Review snapshot: Users praise the smooth, low-cycling operation; occasional notes about noise if hard-mounted or run without an accumulator.
3) Renogy Wanderer Li 30A 12V PWM Charge Controller
Why it helps: Protects your battery and delivers multi-stage charging; supports lithium, AGM, gel, and flooded.
Notable features: 4-stage PWM (Bulk/Boost/Float/Equalization), temperature sensing, and common protections against reverse polarity/overcharge/short circuit (per listing).
Pros: Reliable brand; clean, compact install.
Cons: It’s PWM; for maximum panel harvest, consider MPPT.
Best for: Cost-effective systems up to small multi-zone gardens.
4) LiTime 12V 50Ah LiFePO₄ Battery
Why it helps: Light, long-life storage so you can water at dawn/dusk and ride out cloudy spells.
Notable features: Built-in BMS; models rated for thousands of cycles (some listings cite 4000+ cycles, model-specific).
Pros: Excellent cycle life vs. lead-acid; compact and easy to handle.
Cons: Observe cold-weather charging limits noted by the manufacturer.
Best for: Daily-use backyard systems.
5) Rain Bird LNDDRIPKIT Drip Irrigation Kit (108-Piece)
Why it helps: A complete distribution kit—tubing, emitters, micro-bubblers, micro-sprays, fittings—to get water neatly to roots.
Notable features: Pressure-compensating devices, simple faucet connection; marketed benefits include up to “80% water savings” (kit contents vary by listing).
Pros: Easy to customize; reliable components.
Cons: You may want extra 1/2″ mainline for larger beds.
Best for: First-time drip installs and raised beds.
Product page: Rain Bird LNDDRIPKIT.
Comparison Table (updated)
| Model | Key Spec(s) | Warranty* | Approx Price/Tier | Best For |
| ECO-WORTHY Solar Submersible Pump Kit | 100W panel + 12V submersible pump; basic controller | Per listing | $$ (mid) | Simple all-in-one starts |
| SHURFLO 4008-101-E65 Revolution | ~3.0 GPM, ~55 PSI, self-priming | 2-Year (aftermarket) | $$ (mid) | Stable drip pressure |
| Renogy Wanderer Li (30A PWM) | 12V, multi-chemistry, 4-stage PWM | Manufacturer | $ (budget) | Battery protection |
| LiTime 12V 50Ah LiFePO₄ | ~640 Wh, BMS; long cycle life | Manufacturer | $$ (mid) | Daily cycling |
| Rain Bird LNDDRIPKIT | 108-piece drip/micro kit | Manufacturer | $ (budget) | Distribution made easy |
Need a Quick Primer on Panels?
If you’re new to handling small modules and want practical placement tips, this guide to portable solar panels for camping is a handy read—the principles transfer perfectly to garden builds.
FAQs
How big should my solar panel be for a small backyard system?
Start from pump run-time × current draw to get daily Wh. In many temperate locations, 50–100 W supports a single 3.0 GPM pump for one or two zones. Go larger if you add valves or face shade.
Do I really need a battery, or can I go “panel-to-pump” only?
Daylight-only works, but a battery smooths cloudy spells, enables dawn/dusk watering, and protects the pump with proper start/stop logic. Most people prefer the flexibility.
What’s better for vegetables—drip emitters or micro-sprays?
Use drip emitters for tomatoes, peppers, and perennials (precise, low evaporation). Use micro-sprays for densely planted greens or seedling flats that benefit from gentle, even coverage.
How do I prevent emitter clogs?
Install an inline filter, flush lines monthly, and choose pressure-compensating emitters. If your water is silty, add a sediment pre-filter at the source.
Can a solar pump handle elevation changes?
Yes—size the pump for total dynamic head (vertical lift + friction losses) and keep runs efficient. If the garden sits well above the tank, consider stepping up pump head and splitting zones.
In short: Start simple, size with a little headroom, and automate just enough to match your plants’ rhythm. Once your Solar-Powered Irrigation System Project clicks, you’ll spend more time harvesting and less time hose-wrangling. You’ve got this—one sunny afternoon of setup, and your beds will be sipping happily on schedule.